
AI video is one of the most exciting creative tools I have worked with. It is also an easy place to spend money generating something that looks impressive and still misses the point.
My goal is movie-level quality: deliberate lighting, believable motion, a coherent visual style, and sound that supports the story. Tools such as Google's Veo and ElevenLabs give me ways to work toward that standard. The result still depends on the direction I provide and the work of reviewing and finishing the video.
That is why I see prompt engineering as part of production. When each new variation can consume credits, figuring out what you want before pressing Generate becomes valuable work.
The Tools Are Powerful. The Brief Still Matters.
My earlier experiments included Sora, where watermarks were a frustration for the finished output I wanted. That experience made me pay more attention to the whole path from an idea to a usable export.
Today, I use tools such as Google Veo and ElevenLabs in my video workflow. Veo is Google's video-generation model; Google Flow is one of Google's creative environments for working with it.
ElevenLabs brings visual generation and audio work into the same broader toolkit. Its Image & Video documentation explains how prompts and reference media can be used to create assets and bring them into Studio projects. Voice, sound, timing, and the edit all contribute to the finished piece.
For me, the important question is whether those tools can deliver the particular shot the project needs. "Make a cinematic ad" leaves a lot of decisions open: what the viewer sees, what moves, what the camera does, and what the scene is meant to communicate.
A Completed Generation Can Still Be the Wrong Take
The cost problem is easy to underestimate. A render might complete successfully while showing the wrong action, losing the product's appearance, or using a camera move that does not fit the story. Producing another take can mean spending more credits.
That is different from a technical failure. Google's Flow help page says failed generations are not charged. ElevenLabs' Image & Video API documentation also says failed generations are not charged. A completed result that misses a creative expectation should not be confused with that failure status.
ElevenLabs shows the generation cost before submission, based on the selected model and settings. I want to review that cost alongside the shot brief, rather than discover how expensive the exploration was after a series of revisions.
The risk I am trying to reduce is avoidable iteration: paying to discover requirements that could have been made clear beforehand.
Start With the Film You Want to Make
Before generating a clip, I want a useful answer to a few questions:
- Purpose: What should the viewer understand, feel, or do?
- Audience and placement: Is this for a website, a product launch, or a social feed?
- Subject and action: What is in the frame, and what happens during the shot?
- Visual direction: What framing, camera movement, lighting, and atmosphere support the idea?
- Continuity: Which product details, characters, colors, or reference images must remain consistent?
- Sound: Does the scene need dialogue, narration, music, ambient sound, or silence?
- Delivery and budget: What duration, aspect ratio, outputs, and revision allowance are we working toward?
These decisions turn a broad idea into a brief I can work with. They also make the result easier to judge. If we have never defined what the shot should achieve, it is difficult to know whether another generation is an improvement.
A Real Example: Directing a Three-Shot Scene
One successful prompt I worked with was for a 14-second vertical video set inside a theater-style nightclub. Two characters notice each other across the room, and the sequence moves from a balcony close-up to a view of the dance floor, then into a close-up of the second character.
The idea sounds simple. Getting the result I wanted took much more direction than that description. Here is a summary of the decisions I put into the prompt:
- Format and setting: A 9:16 frame, shallow focus, and a dark interior throughout the entire sequence. I explicitly ruled out exterior locations because an earlier draft had placed one character outside.
- A role for every reference: Two attached images supplied the characters' faces, hair, and build. An attached draft video supplied the venue, lighting, camera movement, and pacing. I specified that the draft's people and clothing should not carry into the new result, and that the photos' backgrounds should not influence the setting.
- Character continuity: Each character had a stable label tied to the correct image, along with clothing and appearance instructions. That gave me a consistent way to refer to each person across shots.
- A timed shot plan: The opening five seconds established the balcony character and his changing expression. The next five moved behind his shoulder to reveal the second character below. The final four brought that second face close enough to evaluate against its reference.
- Performance and framing: I described the first character's smile fading, the second character's stance and expression, and the foreground silhouette that needed to remain visible during the balcony view. These were specific actions and compositions to review in the output.
- Sound and exclusions: The music needed to build toward a particular cut. I also defined unwanted elements, including logos, overlays, and sportswear, to keep the scene aligned with the intended look.
The references were part of the instructions. In that interface, I used the attachment identifiers to tell the model which image or video each instruction applied to. Simply mentioning a reference in the text is not enough: attach the actual media using the tool's supported controls, then explain what it should contribute and what it should leave out.
This was also a revision of an earlier attempt. I had identified concrete problems: the wrong location, an expression that did not change as intended, and a character whose face needed a clearer close-up. Those observations became targeted instructions for the next version.
That is the level of effort I mean by prompt engineering. It is deciding how references, identity, movement, timing, and sound should work together, then giving the model a clear brief. A detailed prompt gave me a useful way to direct and evaluate this scene; it does not guarantee that every model will follow every instruction perfectly.
Iterate With a Reason
I want each revision to answer a specific question. Was the camera movement wrong? Did the subject change? Was the shot too busy? Did the narration need more room?
Changing one important variable at a time makes it easier to understand what helped. I also want to keep the prompt, references, settings, and notes for useful takes so the next shot can build on that work.
There is a connection here to the Markdown skills I use for repeatable work. Once a project's visual direction and working instructions are established, they can be saved as a reusable reference instead of being reconstructed for every clip.
A strong prompt improves the starting conditions. Review and iteration are still part of the craft. My aim is greater consistency and less avoidable spend, rather than a promise that every generation will be perfect.
Perfecting Images With a Second Model as Reviewer
Still images are part of the same production work. A reference frame, a product shot, a storyboard panel, or a technical diagram often comes before any video is generated. Image generation has the same problem as video: the result can look polished and still be wrong in the details.
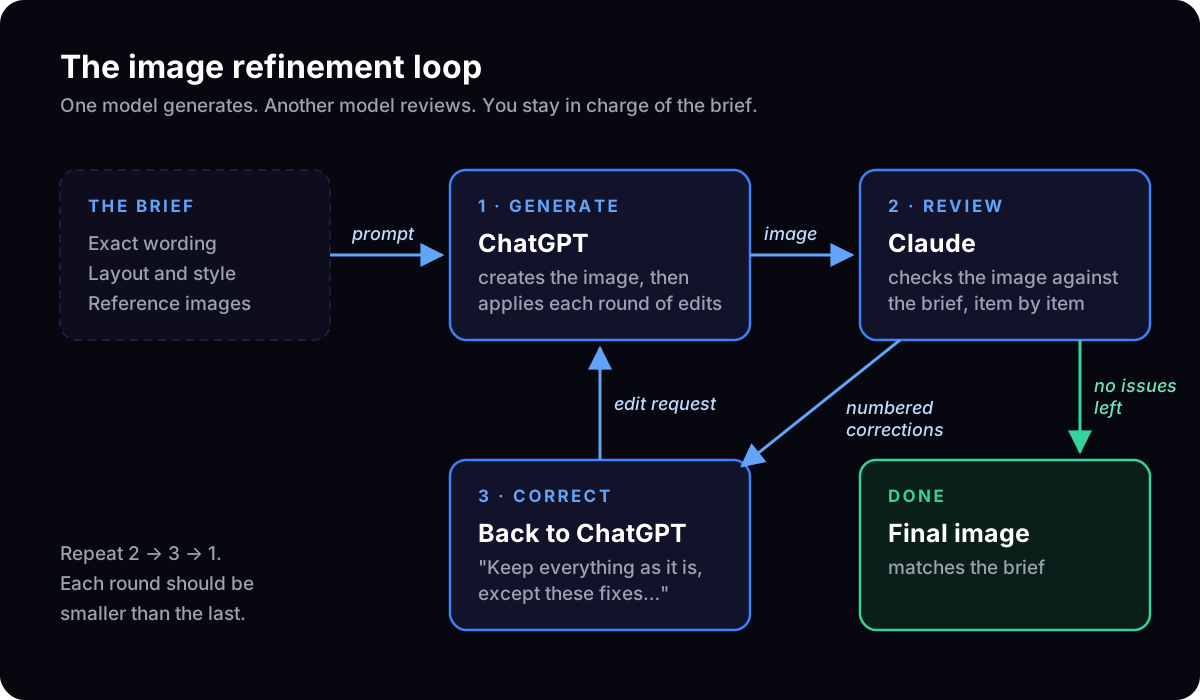
One technique I use is to let two models play different roles:
- Generate the image with ChatGPT. I give ChatGPT's image generator a detailed brief: the exact wording, the layout, the visual style, and any reference images or logos it needs to match.
- Give the image to Claude for review. I share the generated image with Claude along with the original brief and ask it to compare the two, item by item. What text is misspelled? Which arrow points to the wrong place? What was added that the brief never asked for?
- Send Claude's feedback back to ChatGPT. Claude turns its review into a numbered list of corrections. I paste that list into ChatGPT as an edit request, and the loop starts again with the new version.
Why a Second Model Helps
When I look at an image I just asked for, I tend to see what I expected to see. A fresh review against the written brief catches the details that are easy to skim past: a typo inside a box, a label that drifted from the wording I specified, a connector that ends at the neighbouring box instead of the right one.
A separate reviewer also makes the corrections more precise. "The diagram looks a bit off" gives the generator very little to work with. "The arrow labelled 'interaction log' must end at Usage Logs, not Knowledge Base" is something it can act on.
What a Review Round Looks Like
Consider an illustrative architecture diagram with exact labels, a legend, and several connecting arrows. A convincing-looking draft might still contain incorrect connections, misspelled labels, or text that differs from the brief. A review request could produce corrections such as:
Keep everything exactly as it is, except these corrections:
1. The arrow labelled "interaction log" must end at the Activity Log box, not the Search Index.
2. Fix the typo "Customer Portol" → "Customer Portal".
3. Replace the top-left logo with the attached file.
Do not change anything else.
Each round should be checked against the brief to confirm that the corrections were made without introducing new errors.
A few habits make the loop converge instead of drifting:
- Start with "Keep everything exactly as it is, except…" Without that line, a regeneration can fix one problem and quietly introduce three new ones.
- Number every correction and name its location. Point to the specific box, label, or arrow, and say what it should become.
- Quote the exact text. For any words in the image, give the correct spelling in quotation marks rather than describing it.
- Attach the real asset. If a logo or product detail comes out wrong, attach the correct file instead of describing it again.
- Expect each round to get smaller. In practice the first round might fix a dozen issues, the next a handful, and the last one or two arrows and a word. If the list stops shrinking, rewrite the brief instead of adding more rounds.
- Know when to finish by hand. For a final small text fix, an image editor can be quicker than another generation.
This works for anything with a clear specification: diagrams, infographics, slides, product visuals, and the reference frames I later use to keep a video's look consistent. The models do the generating and checking. I still decide what the image needs to say and when it is finished.
Editing Existing Footage With FaceFusion
A separate project shows how I use a coding agent for an existing-video edit. I worked through a movie-scene meme with Claude, replacing faces on different characters while preserving the scene's action and original audio.
That workflow used FaceFusion and FFmpeg. It was an edit of existing footage, rather than a new scene generated by Veo or another video model.
FaceFusion is the face-manipulation project used in this example. Its command-line interface supports headless processing, which lets a coding agent help run and organize jobs from a terminal. The project publishes its code under an OpenRAIL-AS license.
What the Workflow Involved
The work happened shot by shot:
- Inspect the source. Use FFmpeg to crop the usable picture, identify cuts, and make a contact sheet of timestamped frames.
- Map the replacements. Decide which supplied face belongs to each character and which segments need processing.
- Test a short segment. Run FaceFusion with a selected face-swapping model and inspect the output before processing more footage. This run used a pre-trained model; it did not involve training a custom model for each person.
- Use the right editing technique. Visible faces could receive a face swap. Some helmet and mask shots needed timed face overlays instead. Those overlays had to end at the cut so they did not carry into the next shot.
- Reassemble and review. Combine the processed segments, keep the original audio, and check the cuts, face placement, framing, and export. The resulting version was a 720p landscape video intended for a group chat.
Claude helped inspect the material, prepare commands, organize the segment jobs, and iterate on the edit. FaceFusion performed the face processing, and FFmpeg handled video preparation and assembly. A Codex environment can also be used to work with a local command-line project like this when the required software and hardware are available.
Source Quality Sets the Starting Point
This project also made a quality limit clear. The usable movie picture in the source screen recording was only about 440 pixels wide. Exporting it at a larger resolution could not establish that it contained the detail of a sharp original.
When I asked about a 4K version, a short upscaling test showed that processing would also be slow on the machine being used. A better source clip was the more useful next step. The same edit could then be revisited with better starting material.
That is a different cost problem from spending credits on generated takes: local processing still uses time and computing resources. A short test helps decide whether a longer run is worth doing.
For a meme or parody, I would use my own face or participants who agreed to the edit and make the manipulation clear. The creative idea, source quality, shot-by-shot choices, and review all matter alongside the software.
How I Can Help
I offer AI video generation and prompt engineering through JedAI: helping turn a creative idea into a shot plan, developing prompts and references, working through generation and revision, and bringing the selected footage and audio toward a polished final edit.
That can support product explainers, launch videos, short advertisements, social content, or a creative concept that needs a more cinematic presentation.
The value I bring is the direction around the tools: clarify the expected result, make the instructions specific, evaluate the output, and focus the next revision. Before production, we can agree on the deliverables, generation budget, and revision scope.
If you have an idea in mind, explore the video service or send me a project brief. Tell me what you want the viewer to experience and where the finished video will be used. We can work out the production approach from there.