

Building a website used to mean choosing between a drag-and-drop builder with limits or hiring a developer for every change. AI coding agents changed that. Today you can describe the site you want, watch an agent write the code, and have it live on your own domain the same day.
The part that still trips people up is everything around the code: the domain, the repository, the hosting account, and the DNS records that connect them. This is the path I follow, step by step.
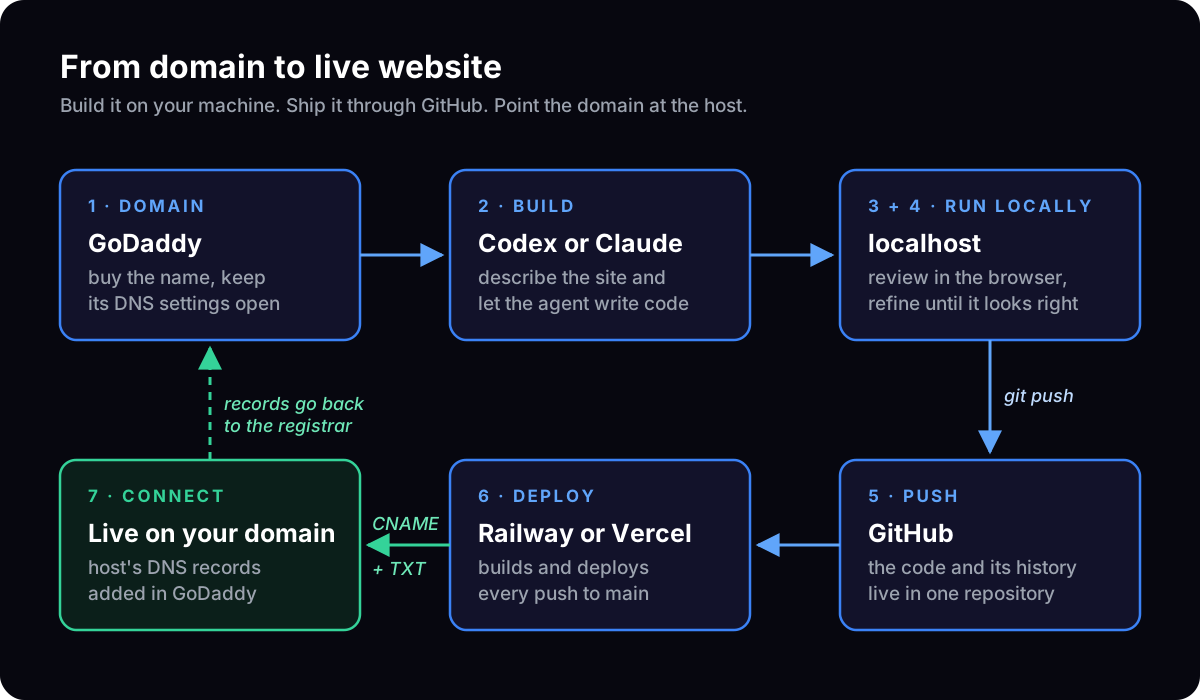
Step 1: Find a Good Domain
Your domain is your address on the internet, so it is worth a little thought before you buy.
What I look for:
- Short and easy to say. If you have to spell it out every time you say it, keep looking.
- No hyphens or odd spellings. People will type the obvious version.
- The right ending. A
.comis still what most people guess first. Other endings such as.ai,.co, or.bizcan work well when they fit the brand. - Matching social handles, if social media matters for the business.
I buy my domains on GoDaddy. Search for the name, add it to your cart, and check out. GoDaddy will offer hosting, website builders, and email along the way. You do not need its hosting for this approach, because the site will run on Railway or Vercel.
After you buy it, you will find the domain in your GoDaddy Domain Portfolio. Remember where it is. You will come back to its DNS settings in the last step.
Step 2: Build the Website With Codex or Claude
This is where AI does the heavy lifting. I use coding agents such as OpenAI's Codex and Anthropic's Claude Code. Both can read and write files in a project folder and run commands on your computer.
Start with a clear brief. The better you describe the site, the better the first version will be:
Build a website for a neighborhood coffee shop.
Pages: Home, Menu, About, Contact.
Style: warm colors, large photos, clean modern typography.
Include: opening hours, a map link, and a contact form.
Use Next.js and keep it easy to deploy to Railway or Vercel.
Explain how to run it locally when you are done.
Asking for a modern framework such as Next.js gives you a project that the hosting platforms recognize automatically, which makes the deploy step much easier.
If the site needs secret values, such as an API key for a chatbot or a database connection, ask the agent to keep them in a .env file and to make sure that file is listed in .gitignore. Secrets should never be pushed to GitHub. You will enter them in the hosting dashboard instead.
Step 3: Run It Locally
Before anything goes on the internet, you run it on your own computer. For a Next.js project, that usually looks like this:
npm install
npm run dev
Then open http://localhost:3000 in your browser. localhost means "this computer," so you are the only one who can see it.
Step 4: Refine Until It Looks Right
This is the creative loop, and it is where most of the time goes.
Look at every page on a laptop screen and a phone-sized window. Then tell the agent what to change, as specifically as you can:
- "Make the hero image take up the full width on mobile."
- "The menu prices are hard to read. Increase the contrast."
- "Add a footer with the address and Instagram link."
The dev server usually reloads as soon as a file changes, so you see each fix within seconds. Keep going until you would be proud to send someone the link.
Before moving on, ask the agent to run a production build (npm run build). If the build fails on your computer, it will fail on the host too, and it is much easier to fix here.
Step 5: Push It to GitHub
GitHub stores your code and its full history, and it is what the hosting platform will watch for changes.
- Create a free GitHub account if you do not have one.
- Create a new repository. A private repository is fine.
- Push your project to it. Your coding agent can do this for you, or you can run the commands yourself:
git init
git add .
git commit -m "First version of the website"
git branch -M main
git remote add origin https://github.com/YOUR-USERNAME/YOUR-REPO.git
git push -u origin main
Check the repository page on GitHub afterward and confirm your .env file is not there.
From now on, the main branch is your live website. Anything you push to it will be deployed.
Step 6: Connect GitHub to Railway or Vercel
Both platforms turn a GitHub repository into a running website, and both can deploy automatically each time you push. I use Railway for my own sites. Vercel is another strong choice, especially for Next.js, which Vercel created.
On Railway
- Sign up with your GitHub account so Railway can see your repositories.
- Create a new project and choose to deploy from a GitHub repository. Pick the one you just pushed.
- Railway detects the framework, builds the site, and starts it.
- Open the service's Variables tab and add the same secret values from your
.envfile. - In the service's Settings, under Public Networking, generate a Railway domain. You will get a temporary address ending in
.up.railway.app. Open it and confirm the site works.
Services linked to a GitHub repository deploy when you push to the connected branch (Railway docs). Railway also needs to know which port your app listens on. Most frameworks, including Next.js, use the PORT value Railway provides, and the domain settings let you pick or change the target port if needed.
On Vercel
- Sign up with your GitHub account.
- Add a new project and import your repository.
- Vercel detects the framework and fills in the build settings. Add your secret values under Environment Variables, then deploy.
- You will get a temporary address ending in
.vercel.app. Open it and confirm the site works.
Step 7: Point Your GoDaddy Domain at the Host
This is the step with the most unfamiliar terms, so here is the short version of what is happening. DNS is the internet's address book. You are adding entries in GoDaddy that say "when someone visits my domain, send them to my Railway or Vercel site."
Two record types matter here:
- A CNAME record points a name, such as
www, to another name, such as your host's address. - A TXT record is a line of text the host uses to confirm you own the domain.
In GoDaddy, open your Domain Portfolio, select the domain, and select DNS. To add a record, select Add New Record, choose the type, fill in the Name and Value, and save (GoDaddy help). In the Name field, you enter only the part before your domain, such as www, not www.yourdomain.com.
If you host on Railway
- In Railway, open the service's Settings, find Public Networking, and click + Custom Domain.
- Enter
www.yourdomain.com. Railway shows two records to add (Railway docs). - In GoDaddy, add both:
- Type: CNAME, Name:
www, Value: the address Railway shows, ending in.up.railway.app - Type: TXT, Name: the name Railway shows, which for a
wwwdomain looks like_railway-verify.www, Value: the code Railway shows, starting withrailway-verify=
- Type: CNAME, Name:
- If GoDaddy already has a
wwwrecord, edit it instead of adding a second one. A name can only point to one place. - Wait for the green check mark in Railway. It issues the security certificate for
httpsautomatically.
Both records are required. Railway's documentation notes that without the TXT record, the domain will not verify and visitors can get an error even after the CNAME works.
What about the bare domain, without www? Railway's documentation lists GoDaddy among DNS providers that cannot point the root domain to Railway, because GoDaddy does not support the CNAME flattening Railway needs there. The simple fix is the one I use: send the bare domain to the www version with GoDaddy's forwarding.
- In GoDaddy's DNS settings for the domain, select Forwarding, then Add Forwarding, and choose the domain itself.
- Enter
https://www.yourdomain.comas the destination. - Choose Permanent (301), and do not choose masking.
- Save (GoDaddy help).
GoDaddy manages the root record for you once forwarding is on. Anyone who types yourdomain.com now lands on https://www.yourdomain.com. That is exactly how this site is set up: jedai.biz forwards to www.jedai.biz, which runs on Railway.
If you would rather have the bare domain be the main address, Railway's documentation suggests moving the domain's DNS to a provider such as Cloudflare that supports CNAME flattening.
If you host on Vercel
- In your Vercel project, open Settings, then Domains, and add your domain. Vercel will suggest adding the
wwwversion too. - Vercel shows the records your project needs. In GoDaddy, add them:
- Type: A, Name:
@, Value: the IP address Vercel shows for the root domain. Vercel's general value is76.76.21.21, but use the one on your domain card (Vercel guide). - Type: CNAME, Name:
www, Value: the project-specific address Vercel shows (Vercel docs).
- Type: A, Name:
- Replace any existing
@A record orwwwrecord instead of adding duplicates. - Wait for Vercel to show the domain as valid. It will also redirect between
wwwand the bare domain based on which one you choose as the main address.
Because Vercel supports an A record at the root, you do not need GoDaddy's forwarding for this setup. In fact, GoDaddy locks the root A record while forwarding is turned on, so leave forwarding off when using Vercel.
Be Patient With DNS
DNS changes are not instant. GoDaddy says most changes take effect within an hour but can take up to 48 hours to spread everywhere, and Railway's documentation allows up to 72 hours. If the site does not load right away, wait before changing anything. Changing records repeatedly only restarts the clock.
A few checks if it still is not working:
- Did you enter only
wwwin the Name field, not the full domain? - Is there an older record with the same name still in place?
- Did you add the TXT verification record as well as the CNAME?
- Does the temporary
.up.railway.appor.vercel.appaddress still work? If not, the problem is the deploy, not DNS.
Step 8: Update It Anytime
This is the payoff. Once everything is connected, updating the site follows a simple loop:
- Ask Codex or Claude for the change.
- Check it locally.
- Push to GitHub.
Railway or Vercel picks up the push, rebuilds the site, and replaces the live version automatically. No uploading files, no logging into a server. Every version is saved in GitHub, so you can always go back if something goes wrong.
Want Help With Your Site?
This is the same process behind the website development and hosting service I offer. If you would rather have someone handle the domain, build, deployment, and DNS for you, or you are stuck on one of these steps, send me a transmission and tell me what you are building.